Wednesday, January 30, 2008

Stack the Deck Quilt

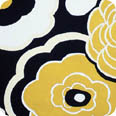
This is my first attempt at a Stack the Deck quilt. It's a simple design, which I saw in a quilting magazine. I found some fun fabric (Lingerie on the Line by Alexander Henry) and combined it with several colors of coordinating cotton jacquard by Robert Kaufman. I also added several other prints from my stash.

The blocks are constructed first by cutting the final shape you want. Then, you shuffle the fabric, so each block has one of each of your desired fabrics in it. It's easy to do, and you can do all kinds of fun things with this technique. You should check out Karla Alexander's books for more ideas using this technique.

To make the blocks go a little further, I alternated them with full-size blocks of another print. This is the first time I've set a quilt on point, and I love the effect. Upon the advice of one of the sales women at the Cozy Quilt Shop, I added a red border to the top and then followed with a second in blue print. The red really makes the blocks pop, I think. To add interest to the quilt top, I added some red chenille strips to the border as well.

I used no batting for this quilt, and a polka-dot minky for the back. It has very light loft and wonderful drape, perfect for a bed topper. (My bed is a California king size, so this quilt is a bit small, but perfect for a topper.) This is a great technique for putting together a larger quilt, and it's fail-proof for beginners.


Monday, January 28, 2008

Emerald Oceans - my first art quilt

Here are some photos of a quilt I just finished (after getting my machine back from the shop).  I'm still working on the binding, and it's the first time I've bound a quilt using anything but my machine. I've used only two fabrics for the top: a brown marble Moda fabric for the border, and feathered print by Robert Kaufman.  I saw the green print at my local quilt shop and fell in love.  On the bolt, it starts with the lightest shade of celadon and fades to a deep forest green.
I didn't use a pattern, but imitated a borgello style of quilt.  If you're not familiar with these, I suggest you check out this book by Marge Edie. They are very fun and easy to do.
It only took a day to assemble the quilt top. The technique I used follows:
  1. I used about 1.5 yards of the green printed fabric, and started slicing in strips.  I cut an equal number of 3", 2.5" and 2" strips for this quilt.  
  2. Next, I sewed each strip into a loop, end to end, so the lightest part of the print met the darkest part (I pressed toward the darkest end).  
  3. Then, I arranged the loops on the floor, and straightened the seams out to make a horizon.  
  4. After I was pleased with the arrangement (I used alternating widths of loops for interest), I cut each of the loops open at the top, and straightened them out.
  5. After numbering the strips carefully with chalk, I sewed them together.  For some reason, my strip-style quilts tend to warp slightly upon assembly.  To fix this, I alternate the sewing direction (that is, sewing from top to bottom and from the bottom to top) when assembling the quilt.
  6. I added a border when I was finished.  This also helps some with getting the fabric to behave itself.
I used a soft 100% cotton batting with low loft, and a fun modern print by Michael Miller for the backing.  For the quilting, I wanted to try my hand at a few free-motion styles.  I used five different colors of thread, including silk and variegated thread. My machine is happiest with Mettler silk finish 100% cotton, but I was also able to use the silk thread without incident.

I marked the quilt with chalk before beginning--simply three wavy lines across the quilt, about where I decided I would switch thread color.  The sky area is quilted in ivory in a meandering curls pattern.  I did wavy lines for the next two shades, echoing each other and becoming more flat as the approach the bottom.  
The last two shades at the bottom of the quilt are in landscape style free-motion, which is a little harder for me than the other styles, but I am pleased with the results.


Friday, January 18, 2008

Oh no!


My weekend has been ruined!  While working on my latest project, my sewing machine quit working!  I've taken it into the shop today, but I hope they get it fixed soon.  What will I do without my sewing machine??
So far, I've moved my kids' machine (yes, they have their own) into place, and I plan to do some piecing, starting on my Alexander Henry quilt.  I miss my machine so much already.  Ack!

Large Scale Prints


I finally found a pattern for some large scale Alexander Henry prints I have been collecting. I think I will borrow this design here for my project.
I've been trying to figure out a way to use mostly large scale prints without having the viewer get queasy.  You can see my concern in my fabric collection.  I'll be sure to post the results as soon as I can get something worth showing!

Thursday, January 17, 2008

Beginner Tips

I have been quilting for about a year and a half.  There are quite a few tools to really help beginners like me "succeed" with their first quilts.  I've posted a picture of my first quilt (a twin size).  I used a pattern I found from About.com Quilting on partial seams, which is a great technique to learn.  There is Lilo, our cat, "helping" with the project.  And here is my list of supplies:
  1. A good sewing machine.  True, you may only be sewing straight lines for the most part.  However, if you can get a machine with presser foot pressure control, half-speed settings, needle stop down position, needle threader, thread cutter, feed dogs that are easy to drop and excellent fabric feed, it will be worth every penny you pay.  Also, my machine allows me to wind a bobbin without unthreading, which is handy.
  2. Patchwork foot with edge guide. Bernina foot #57 is such a foot, but I use a generic one. This foot produces fool-proof 1/4" seams by using a metal (or plastic) guide, which holds the seam allowance in place as you sew.  And most quilters know that if you're even 1/8" off on piecing, your pattern may not work in the end.
  3. Edgestitch foot. Similar to the patchwork foot, this foot has a metal guide down the center of the foot.  You line up the guide right in the ditch, and you've got perfect in the ditch quilting.  Bernina foot #10 is the one I use.
  4. Rotary cutter, mat and ruler.  For those of us who tend to be spastic, this tool is a huge time saver.  If you cut your pieces accurately and use your piecing foot, it's hard to make a mistake.
  5. Shape Cut by June Tailor.  I cannot live without this template.  It's a large plastic template with guides for your rotary cutter.  It's simple to get right angles, on the grain of the fabric, as well as perfect strips.  It saves time and effort.
  6. Mettler silk finish 100% cotton thread.  I have to go to my sewing machine dealer or local quilt store to find this thread.  While it may cost more than Coats & Clark, it's worth the investment.  My sewing machine rarely jams with this thread.  It comes in every color you could want, andholds up well to washing.  It just produces a gorgeous stitch.  My aunt, a woman who has been quilting for years, says if you're going to put the time into it, use products that make it worth your while.
  7. High quality fabric.  You can see my post on fabric hoarding here.  For those of us who are fabric collectors, finding a good deal at Walmart may seem like a good idea. However, imagine putting hours and days or even weeks into working a quilt.  Then, the first time you wash it, it fades.  My approach is to suck it up and support your local quilt shop.  I won't even look at the fabric at Walmart anymore.
  8. Good quality needles.  I have to say, I love Schmetz needles.  I use the top stitch size for free motion quilting, and they work like a charm.  Make sure you actually change them at least at the beginning of any project.  This really makes a difference!
  9. Moda bias binding.  I could not live without this product.  This is not to be confused with any other brand of quilt binding (though I hear Michael Miller has some on the shelf, which might be worthwhile).  Purchased by the yard, this pre-folded double binding makes it simple to finish your quilts.  It's so easy and convenient.  I didn't know about it when I did my first quilt.  But now--oh, so worth a trip to your local quilt store!
  10. 505 Temporary Fabric Adhesive spray.  Manufactured by J.T. Trading Corp, this time saver really assists in basting.  I still use pins to baste, but applying a light coat to the cotton batting (it doesn't work as well with synthetics) reduces puckering, especially in free-motion projects.
Well, this is my current top list.  I hope you enjoy.  Are there any other products you love and can't live without?  Please post them here.  I look forward to seeing your replies!


Tuesday, January 15, 2008

Quilting Quotes

"Before Prozac, there was quilting."

Free quilting patterns


Where is the best place to find free quilting patterns?  Please post your links in the comments below.  I've found many fabric distributors and supply manufacturers have free patterns on their websites.  Here is a summary of my favorites:
Often, many retail outlets also offer free patterns to download or view online.  And there are sites which will sell patterns and offer free downloads before you buy.  Another quick list of my favorites:

Wednesday, January 9, 2008

Book review: Casting Shadows

Casting Shadows is a great book for beginning quilters who are interested in art quilts or adding dimension to their traditional quilts. Colleen Wise uses plenty of examples in her gallery, which provide the reader for a lot of good reading and inspiration. I can highly recommend this book.
I'm a beginner, and you can see my attempt at her quilt pattern "Emerald City" here. I've used mostly greens and browns for my quilt, giving it a tranquil, peaceful feeling.
In this book, you'll find five full-color quilt patterns, plus an amazing number of techniques that you can use in hers or your own patterns. She includes a 16-page gallery of quilts that showcase these techniques at the end of the book.
The author begins by discussing how color and value can add dimension in quilt construction. She continues in additional embellishment techniques such as painting, appliqué, discharging and others for adding shadows to the surface of your quilt. While many of her designs and patterns seem complex, the pattern I used took one day to piece completely. She uses many strip-piecing techniques that are great for a beginner like me.
Casting Shadows includes some more complex patterns which include circles and curved piecing. I haven't tried these yet, however. I'll be sure to post them here when I do.

Ah, fabric!

Fabric hoarders, unite! You know who you are. I've only been quilting for about a year and a half, and I am stunned at the fabric available today. And unfortunately, my budget shows it.
I have discovered that when it comes to fabric, you really do get what you pay for. If you're going to invest your time in piecing and quilting, you might as well invest in fabrics that won't fade with their first washing. In my opinion, it's worth every penny to get nicer fabrics. My current favorites (Check out their websites for lots of great project ideas, too):If you're looking to keep your budget in check, let me recommend a group on Yahoo called the Fabric Co-Op. Instead of the $9 per yard you might pay at your local quilt store, you can get many fabrics at $4.75 per yard. This works best for backing fabrics, or when you need a lot of yardage, since a cutting fee and shipping applies. But overall, you'll get a great deal.
The sample quilt on this post uses a gorgeous ballerina print by Alexander Henry. It's cream colored, but it has such a nice weave that the seam allowances don't show through. The pattern is a square version of this pattern by Diane Weber. I quilted in the ditch around the panel, half-square triangles and borders. I also tried free-motion quilting around the ballerinas in the center panel, which makes them look dimensional. Enjoy!

Welcome!

Welcome to my new quilting blog. I don't have much of an online presence to do with my quilts and sewing projects, and this will be an outlet to share my inspiration with you. I'd love feedback from my readers, also!  I hope you enjoy your visit.